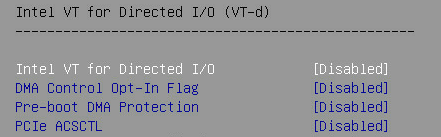
How to Disable Intel VT for Directed I/O (VT-d)
This article explains why Intel VT for Directed I/O (VT-d) reverts to [Enabled] after saving and rebooting, and provides the correct BIOS settings to permanently disable it.
Overview
Disabling VT-d requires two BIOS changes — not just one. The setting reverts because Extended APIC must also be disabled first. Leaving Extended APIC enabled forces VT-d back to [Enabled] on every reboot.
To permanently disable VT-d on the system, follow these steps:
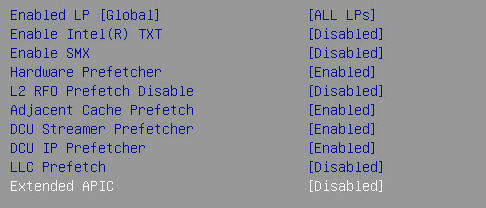
- Disable Extended APIC — Navigate to the Processor Configuration menu and set Extended APIC to
[Disabled]. - Disable Intel VT for Directed I/O — Navigate to the IIO Configuration menu and set Intel VT for Directed I/O to
[Disabled]. - Save and Reset — Save the changes and reboot to apply both settings.
- Verify — Confirm that Intel VT for Directed I/O remains
[Disabled]after the system restarts.
Note: Both settings must be changed in the same BIOS session before saving. Changing only VT-d without disabling Extended APIC will cause VT-d to revert to
[Enabled]on the next boot.
Prerequisites
| Item | Requirement |
|---|---|
| Access Required | Physical or remote KVM access to BIOS |
| BIOS Menu | Advanced → CPU Configuration |
BIOS Configuration
Step 1 — Disable Extended APIC
Navigate to:
CPU → Processor Configuration
Change the following setting:
| Setting | From | To |
|---|---|---|
| Extended APIC | [Enabled] |
[Disabled] |
Step 2 — Disable Intel VT for Directed I/O
Navigate to:
CPU → IIO Configuration → Intel VT for Directed I/O (VT-d)
Change the following setting:
| Setting | From | To |
|---|---|---|
| Intel VT for Directed I/O | [Enabled] |
[Disabled] |
Step 3 — Save and Reset
Select Save Changes and Reset to reboot the system with both settings applied.
Verification
After the system restarts, re-enter BIOS and navigate back to:
CPU → IIO Configuration → Intel VT for Directed I/O (VT-d)
Confirm that Intel VT for Directed I/O now shows [Disabled] and no longer reverts.